
Let's Learn DevOps: Git
Introduction
This is the first episode of article series called "Let's Learn DevOps" where we are going to learn system administration and DevOps engineering with no skills. It's an awesome introduction for everyone who want to try yourself at IT.
This is my study project, since I am going to work as DevOps after I finish my study at university - writing these articles is primary my own attempt to document everything I know and create a few projects to show I can do at lease the most basic things every system administrator should know. I belive this series is more about practice, but I am going to explain some theory and concepts in so-called "Appendix" paragraphs.
I'm kinda nervous writing the first article of this series since I know nothing about my readers experience with computers in the past - some of you may know nothing about the insides of computers and someone is already experienced programmer at big company. This articles is meant to always evolve - with time I am going to add notes and rewrite my paragraphs, so their usefulness should grow with time.
If you experience difficulties in some basic concepts with computers, I recommend you to read Getting started modules at Mozilla Developer Network to get your first soft-skills with editing files and making your first simple website.
Getting Started
DevOps?
You may know about system administrators - it's a person who work at company and help people with their computers, usually they are fixing problems with printers, network and can upgrade computers employers have - update their operating systems, software or even computer's hardware. But, who is DevOps?
DevOps is an abbreviature from Development and Operations. Before, companies have Developers - someone who program software, and Operators - someone who use this software. They always have conflicts like "This software didn't work, you are a bad developer!" and "Everything is alright to me! This is your computer's problem!". You may understand how pain it is, since they always hate each others.
This is where DevOps appears - just in between. He is doing everything to give programmers their comfort programming environment, and create workspace for operators where all the programms writen by developers works exactly the same as for programmers. Their work is all about automations - a way to get done some routine processes like "Restarting computer with database" absolutley automated without even having access to computer - just by network and LAN cables.
This is the reason why I want to be DevOps - it's a pleature to me when I write some program which save me hours upon hours of monotone work just by clicking one single button.
This term DevOps is appeared in 2009 when Belgian IT specialist Patrick Debois started conference called "DevOps Days". Before, most DevOps engineer simply called system administrators - and this is absolutley right, since they are doing the same work but on a different levels.
Recently I discovered Platform Engineers - this is professional DevOps who literally know that much on programming and infrastrucutre building that he is literally make programs for the company he works in - everyone in his company use his products to have stable and predictable behaviour of their services. Platform Engineer is really hard work, so before getting here, DevOps and SREs can spend 10 or even 15 years in this job.
Version Control System
When I started to write this article series, I decided to use a "building blocks" concept - we are going to learn little skills to work with a different programs and then combine these programs and skills into one big computer structure which covers all the stages of making software from Developer to delivering it to Operators and getting feedback from them, just like we are building castle out of blocks we have.
Git and version control systems are the first pieces of our puzzle, because Git could be useful absolutley to anyone - from programmers to musicians and writers with their books, or even average computer users who want to build their flexible file storage system on their hard drives and USB flash drives.
So, what is version controling system? It's a solution to managa your file versions - imagine, you write some book, you make so many different notes and draft-pages before publish your book in it's perfect state. Sometimes you delete something by accident, and want to come back to the state of the book a few months before. This is all the version controlling system, which is shortly called VCS. Instead of storing million versions of the same file, you store only one single file, but record every little change like line deletion or file copying in a history-file.
Git or GitHub
There's so many version controll systems, but the most popular right now is Git. Since 2005, when Linus Torvald, the creator of Linux created Git, it's become *de-facto* standard of version controlling at every company. Git showed there's a simpler way to echange your file changes and versions after painful experiece with SubVersion (svn) and Mercurial (hg) in the past.
However, some companies still use SubVersion and Mercurial in their products, like some old software in development since 90s. Some Git storages support multiple VCS at the same time, like GNU Savannah, and some deprecated svn and hg just like Github done recently.
Git is a program on your computer like any other videogame or software for music making - it's used to create a storages of files and their changes history (the so-called "repositories") and maintain it, while GitHub is like a social network for programmers, a big library of repositories made by users. You can develop some program together with your friends using GitHub or simply use it on your computer for personal file-changes analysis.
GitHub is just one of many different networks, but it's just the most popular - there's also Codeberg and GitLab, and you can even run your own Git Network - we are going to do this in the future articles of "Let's Learn DevOps".
GitHub can be a good opportunity to boost your programmming skills and helping other programmers to improve their products or translating programs on your native language. Having a tonn of complete projects on your GitHub page can be a good sign for people who's in search for someone who would like to work in their company. Please, if you have some programs - don't be shy to share them on GitHub, even if they are simple university projects or games you've made in childhood.
I am going to use a few specific to Git terms, so I feel like reading "Appendix: Glassory" can be a good way to understand some more.

Wait!?
But does that means Git developers using Git to develop Git?!?!
Yes, Nana! You are right [Nana: Yay!], Git developers use Git as their main version controlling system, you even can lookup its source code by yourself on their GitHub page. We are going to do a little experiments with this code a little bit later!
Running Git
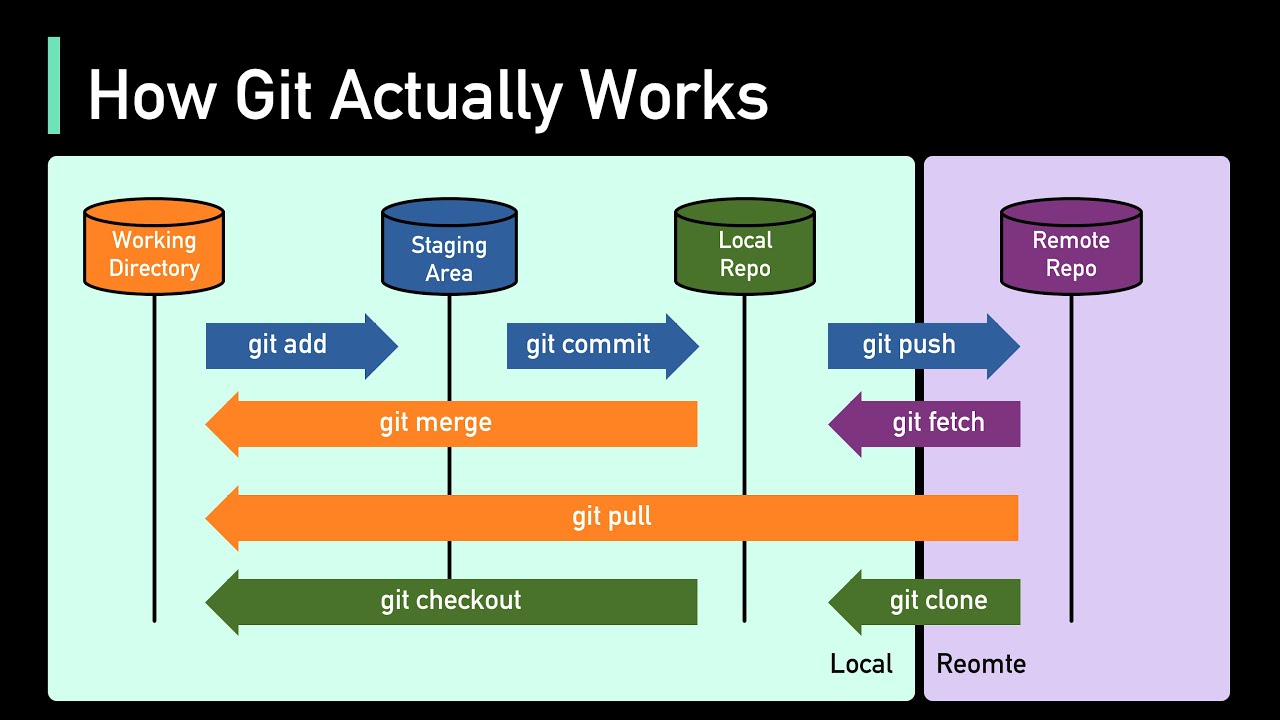
I am going to use a terminal (console, text-mode) version of Git, but there's also official graphical environment for Git called gitk. Unfortunaly, I cannot run it on my computer right now, so I am going to show you a different commands. I feel like it's a good idea to write something like "Appendix: Git in a graphical interface".
As you may see on this picture, you need only 8 commands to use git - actually, in my everyday life I use only 3 of them, so don't blame yourself for not using 100% of Git! Unlike other programs, every of these 8 commands doing only one thing, but doing it really good.
While Git is have only the basic commands for it's own functions, it's nice to know other command-line functions of your operating system, because every DevOps using it every day since it's really fast and informative. There's nothing bad if you prefare to move and copy files with your file manager, but if you want to learn some more - please, read "Appendix: Terminal commands".
Your first repository
To create repository, you may want to use command line interface or graphical interface from gitk. Open terminal and create/navigate to the folder you want to use as a repository - let's imagine I want to track changes in my diary, so I create folder called "Workspace" and initialize new repository with git init:
    > mkdir Workspace

    > cd Workspace

    > git init
    Initialized empty Git repository in /home/jni/git/Workspace/.git/
It's your first git repository! [Nana: Yay! I've made my first repository, I'm so happy!11!1!]. This is the moment you can start tracking your files here - let's put my own diary here.
    > git add Diary.md
    > git status
    On branch master
    No commits yet

        Changes to be committed:
        (use "git rm --cached ..." to unstage)
                new file:   Diary.md
Actually, you can add all the files in your folder with command git add . - just a dot, but sometimes I have an experimental changes in my files I don't want to record in history - like maybe storing some temporary files, so you can just type a specific file names you need at the current moment.
To remove files out of staging list, here is written git rm --cached {file} - you may try these options with different files and see what happend.
Awesome! Let me write some fun message in my diary!
    > cat Diary.md
    09-08-2026: I started a new article on Git! Things goes slow, but doing my best!
Command cat allows me to read the content of text files in my terminal, sometimes it's useful!
    > git status
    On branch master

    No commits yet

    Changes to be committed:
    (use "git rm --cached ..." to unstage)
        new file:   Diary.md

    Changes not staged for commit:
    (use "git add ..." to update what will be committed)
    (use "git restore ..." to discard changes in working directory)
        modified:   Diary.md

    Untracked files:
    (use "git add ..." to include in what will be committed)
        Gokicha.jpg
        RegExp.md
You may see, I also added two new files - my own regexp tutorial I'm writing for yourself and picture of Gokicha, the cockroach girl. Let's add them too, and make our first commit - a record of current state of our files, so we could come back to them at any time, even after a few months of editing these file.
    > git add .
    > git commit -m "my first git commit, added a few test files!"

        [master (root-commit) c058045] my first git commit, added a few test files!
        3 files changed, 43 insertions(+)
        create mode 100644 Diary.md
        create mode 100644 Gokicha.jpg
        create mode 100644 RegExp.md
They put so many scary words and numbers on our screen, but at the end we created our commit! Now we can edit files and come back to our commits at any moment.
You can write one single command istead two: git commit -am "just another commit", which means "add all the unstaged files and print a message".
I added a new record to my Diary, and you can see differences between your last commit and current files stated, just use this simple command:
    > git diff
    diff --git a/Diary.md b/Diary.md
    index 2541449..d4243d3 100644
    --- a/Diary.md
    +++ b/Diary.md
    @@ -1 +1,2 @@
    09-08-2026: I started a new article on Git! Things goes slow, but doing my best!
    +just created my first commit in repository!
This is diff - a special programming language to discibe changes in files. Many software uses diff, becasue it's store only the modified places in files, so you don't need to store every version on your hard drive to restore the exact state of the file. We are going to use diff as separate program in the next episodes of Let's Learn DevOps, but right now just try to edit your files and understand it's notation, it's optional but may be fun to someone!
Let's add this record too, and then I'll show you how to switch between file states using your commits!
    > git commit -am "Don't forget to say some more on this commit too!"

    [master 247390e] Don't forget to say some more on this commit too!
    1 file changed, 1 insertion(+)
Using command git log we can see all the commits in repository and their content. Let's imagine I don't need the last message in my diary at all, so i can restore my file using my commit's id - a unique value for every commit. It may look a bit gross, but you don't need to remmeber it, just copy and paste in git checkout [id] [file] the first numbers and letters of commit you want to checkout, usually people prefare to write first 6-7 characters:
    > git log

    commit 247390eb0bca68664b001fdfc8dff2bbec331b4c (HEAD -> master)
    Author: danielStrawb
    Date:   Sun Aug 9 15:13:19 2026 +0300

        Don't forget to say some more on this commit too!

    commit c0580450cf1aeed4fc481c4c6ca22237e9b57370
    Author: danielStrawb
    Date:   Sun Aug 9 15:00:12 2026 +0300

        my first git commit, added a few test files!

    > git checkout c058045 Diary.md

    Updated 1 path from 410620b

    > cat Diary.md

    09-08-2026: I started a new article on Git! Things goes slow, but doing my best!

    > git checkout HEAD .

    Updated 1 path from 410620b

    > cat Diary.md

    09-08-2026: I started a new article on Git! Things goes slow, but doing my best!
    just created my first commit in repository!
Right here, we used our skills from previous commands - if I need to restore all the files, i can simply put a dot instead of typing every file's name. Instead of typing id of the current commit, you can simply type HEAD.
HEAD is useful when I need to come back to the state of my file "Exactly three commits from the last commit", in this case I am going to use command git checkout HEAD~3 -- Diary.md
While we are using git checkout, it's nice to put -- between commit's name and files we want to restore - it's unnacessary, but sometimes Git can be confused if we already have files with names like "HEAD" or something like this in our repository - just a good tone to avoid problems in future.
That's all the commands we need to know to mantain our own local repositories on our computer - you can put this folder on a USB drive and work with Git on your firend's computers.
Other commands on the picture I showed you before is for publishing your repository online and working with many people at the same time. If you feel like it's enough to you - feel free to use this article as little reference. But, if you want to learn more on Git, I'll show you more cases when Git can be a helpful tool. Stay connected!
Publishing repositories
This is the first and ordinary case of using GitHub. After all the years studying in university, I created a bunch of projects - as example, my WinForms programs on C#, or algorithms on C++. Also, I created a sketch of Internet music store - yes, there's a lot, and I want to structure them, since someone who want to hire me would like to see my skills on everyday projects.
I already have an account on Github, so I'll skip the process of registration.
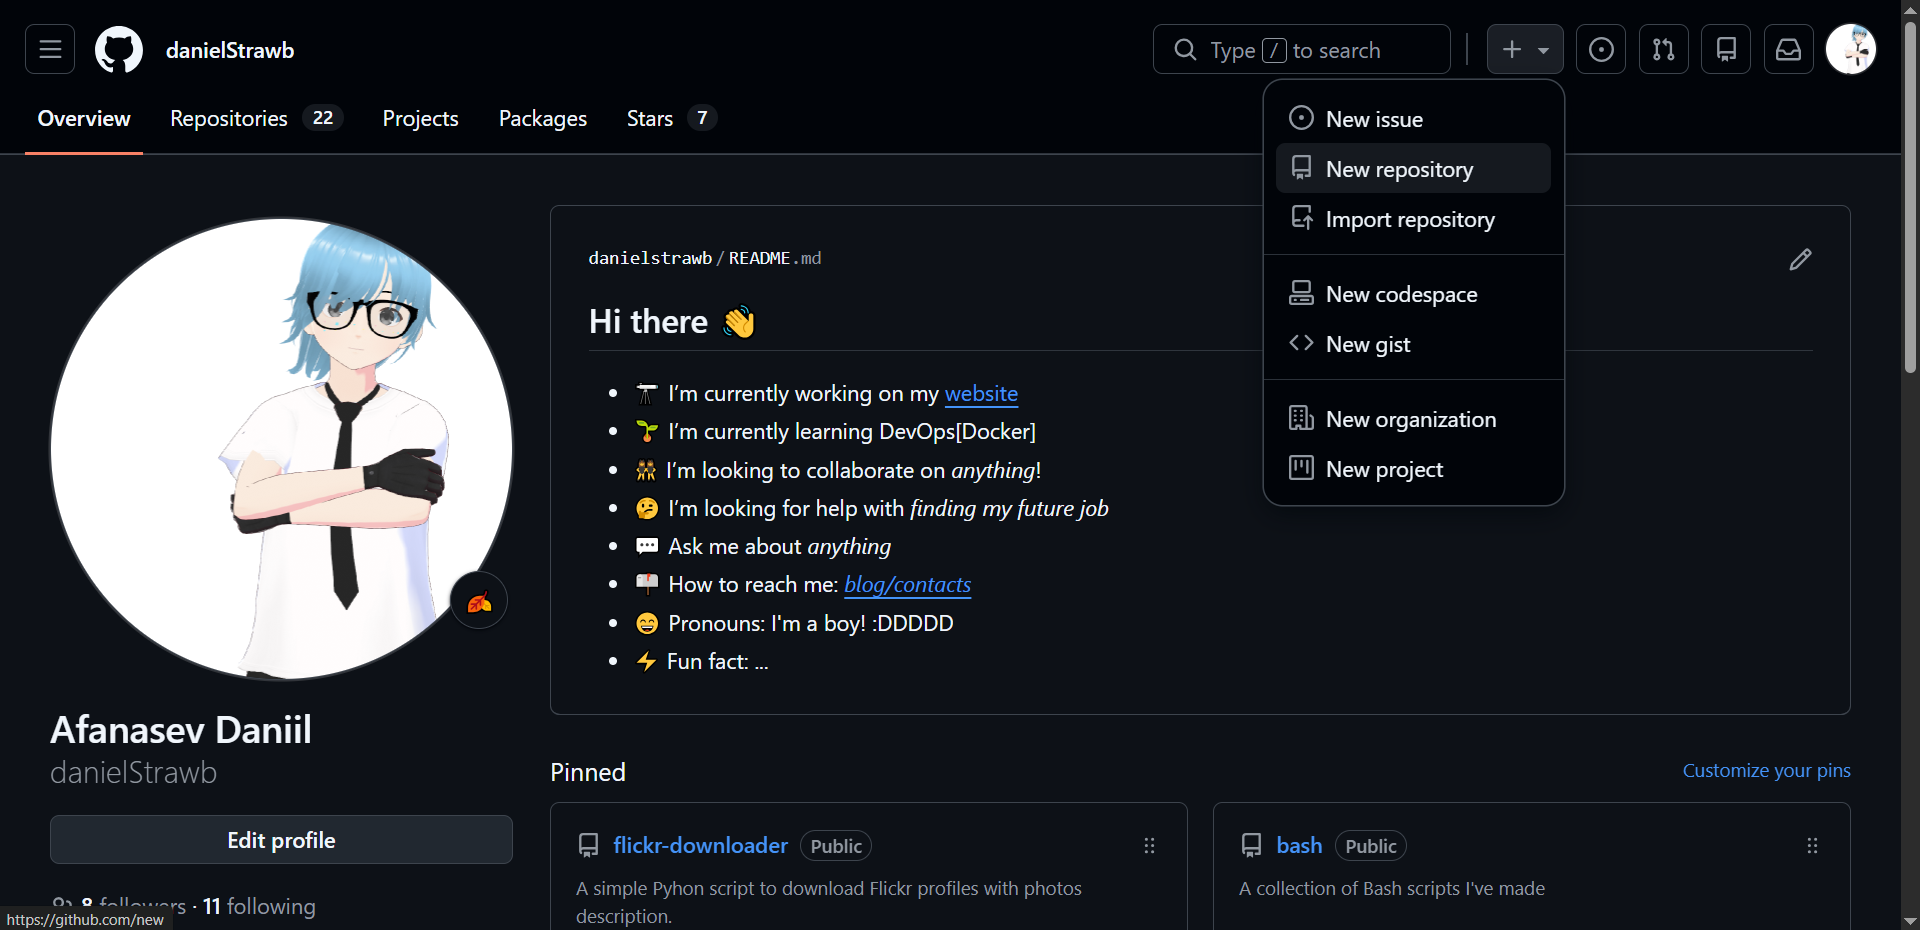
Click on the plus sign and create a new repository. I'm going to make make repository both for my university work and repository we made on our computer before. So I'll name it "danielsblog-git".
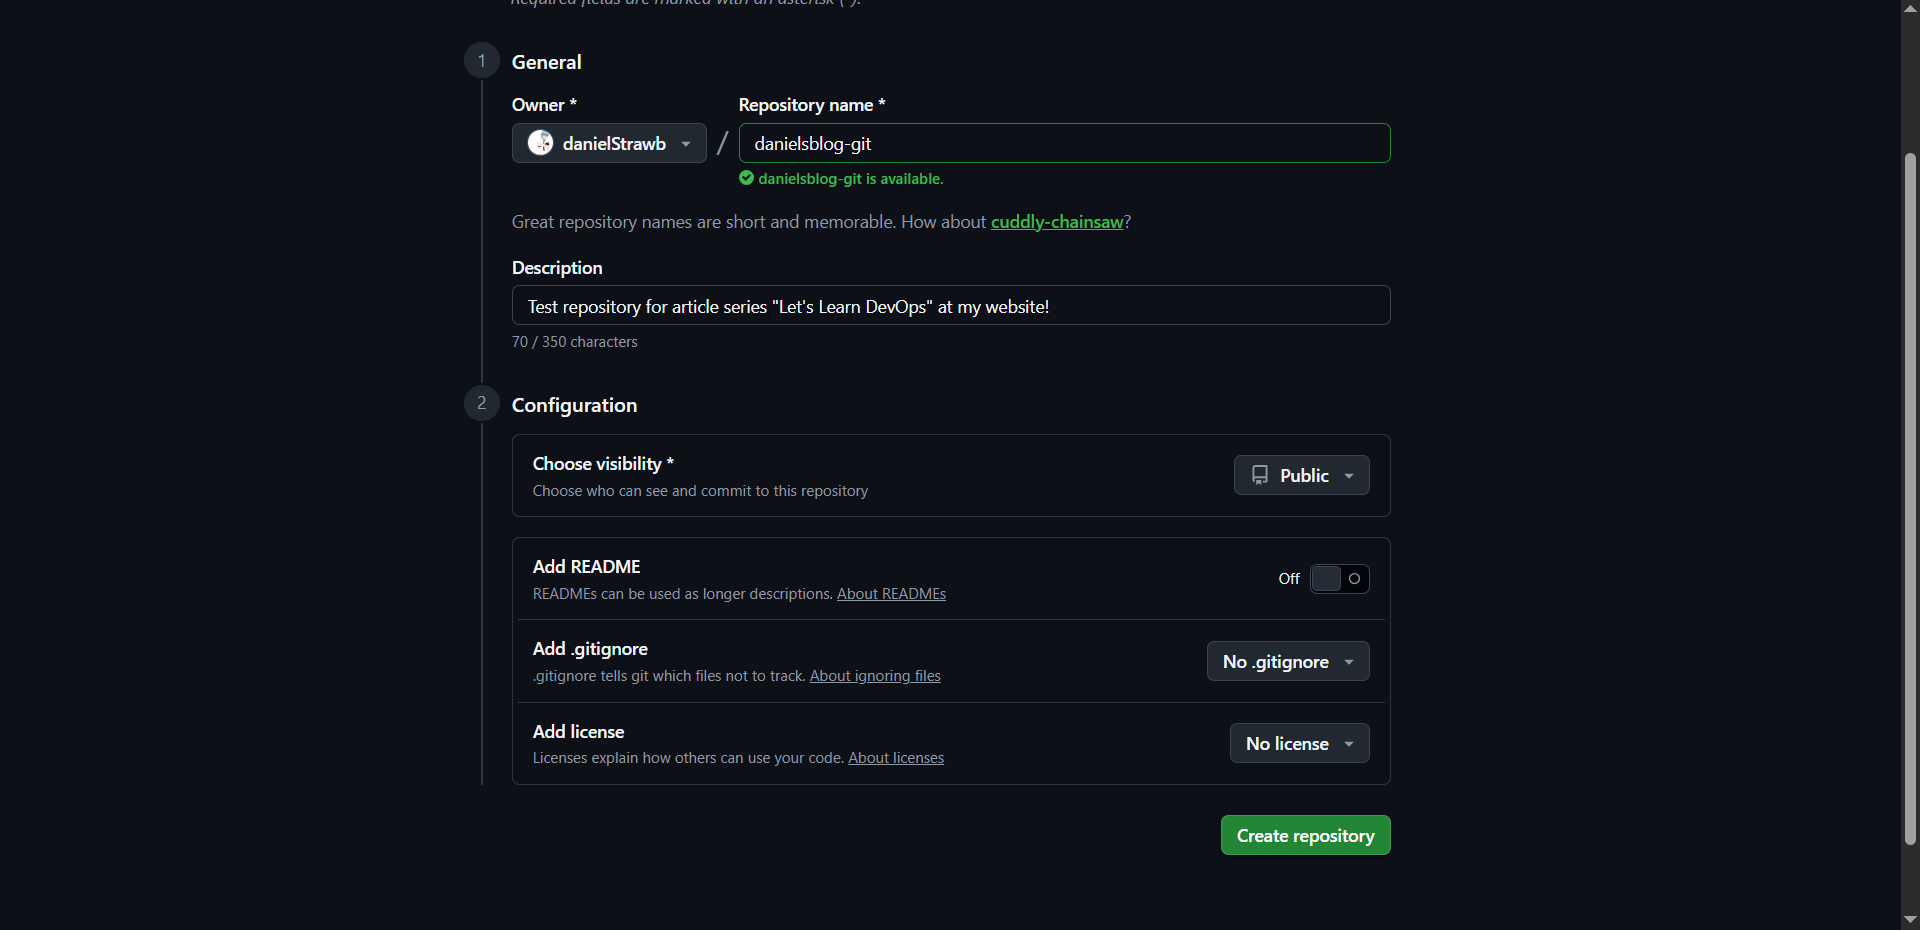
It's going to be a public repository, and I don't want to add extra files like .gitignore - we will discuss them later and create our own.
Click "Create repository" and wait a little bit, while Github create a new repository for you.
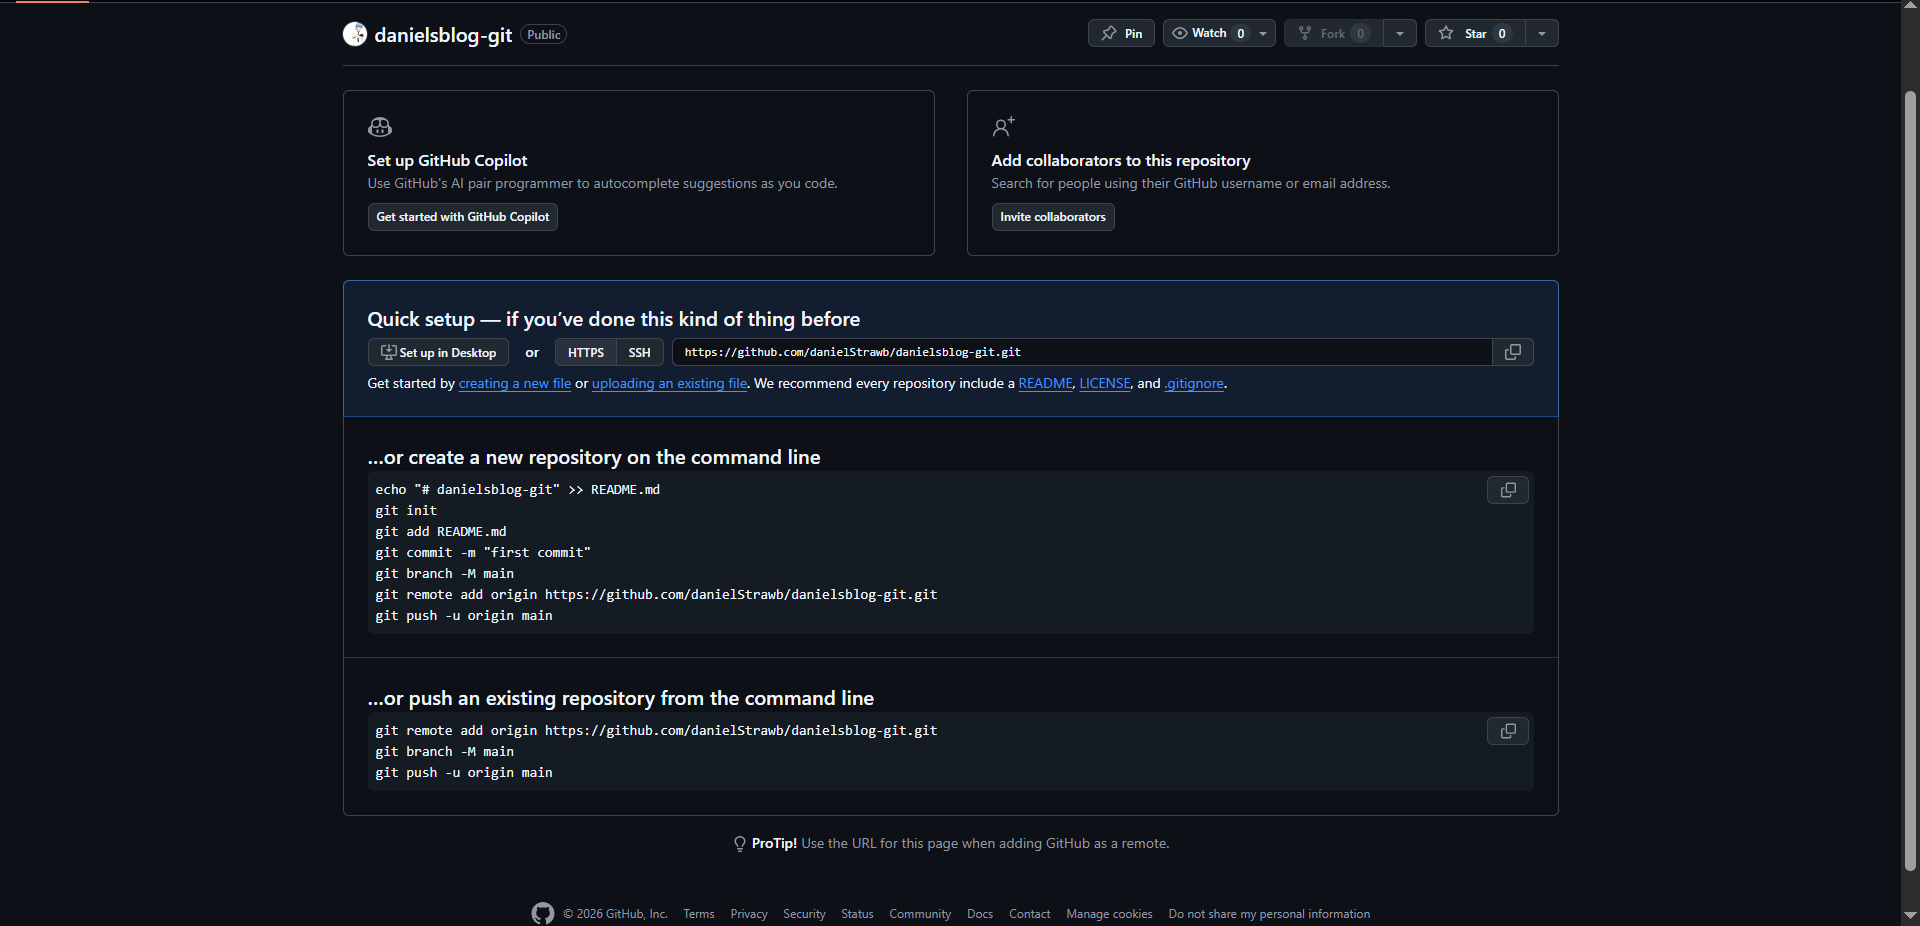
They give us a few ways to upload our files - the most easy is just click on "upload an existing file" and drag-and-drop them, but since we already have a good repository with all the commits, the second way "…or push an existing repository from the command line" is the best in our case.
Open repository folder in command line and copy these commands line-by-line.
    > git remote add origin https://github.com/danielStrawb/danielsblog-git.git

    > git branch -M main
    fatal: cannot rename the current branch while not on any

    > git checkout master

    > git branch -M main

    > git push -u origin main
    Username for 'https://github.com':
    Password for 'https://danielstrawb@github.com':

    Enumerating objects: 8, done.
    Counting objects: 100% (8/8), done.
    Delta compression using up to 8 threads
    Compressing objects: 100% (8/8), done.
    Writing objects: 100% (8/8), 318.07 KiB | 18.71 MiB/s, done.
    Total 8 (delta 1), reused 0 (delta 0), pack-reused 0 (from 0)
    remote: Resolving deltas: 100% (1/1), done.
    To https://github.com/danielStrawb/danielsblog-git.git
    * [new branch]      main -> main
    branch 'main' set up to track 'origin/main'.
This is a little bit tricky fatal error, fix it by switch to master with command git checkout master. Also, unlike other Git repositories, Github require you to enter your api token instead of password, which you can get in Settings > "Developer Settings". That's the reason why many peopel switch to repositories like Codeberg.
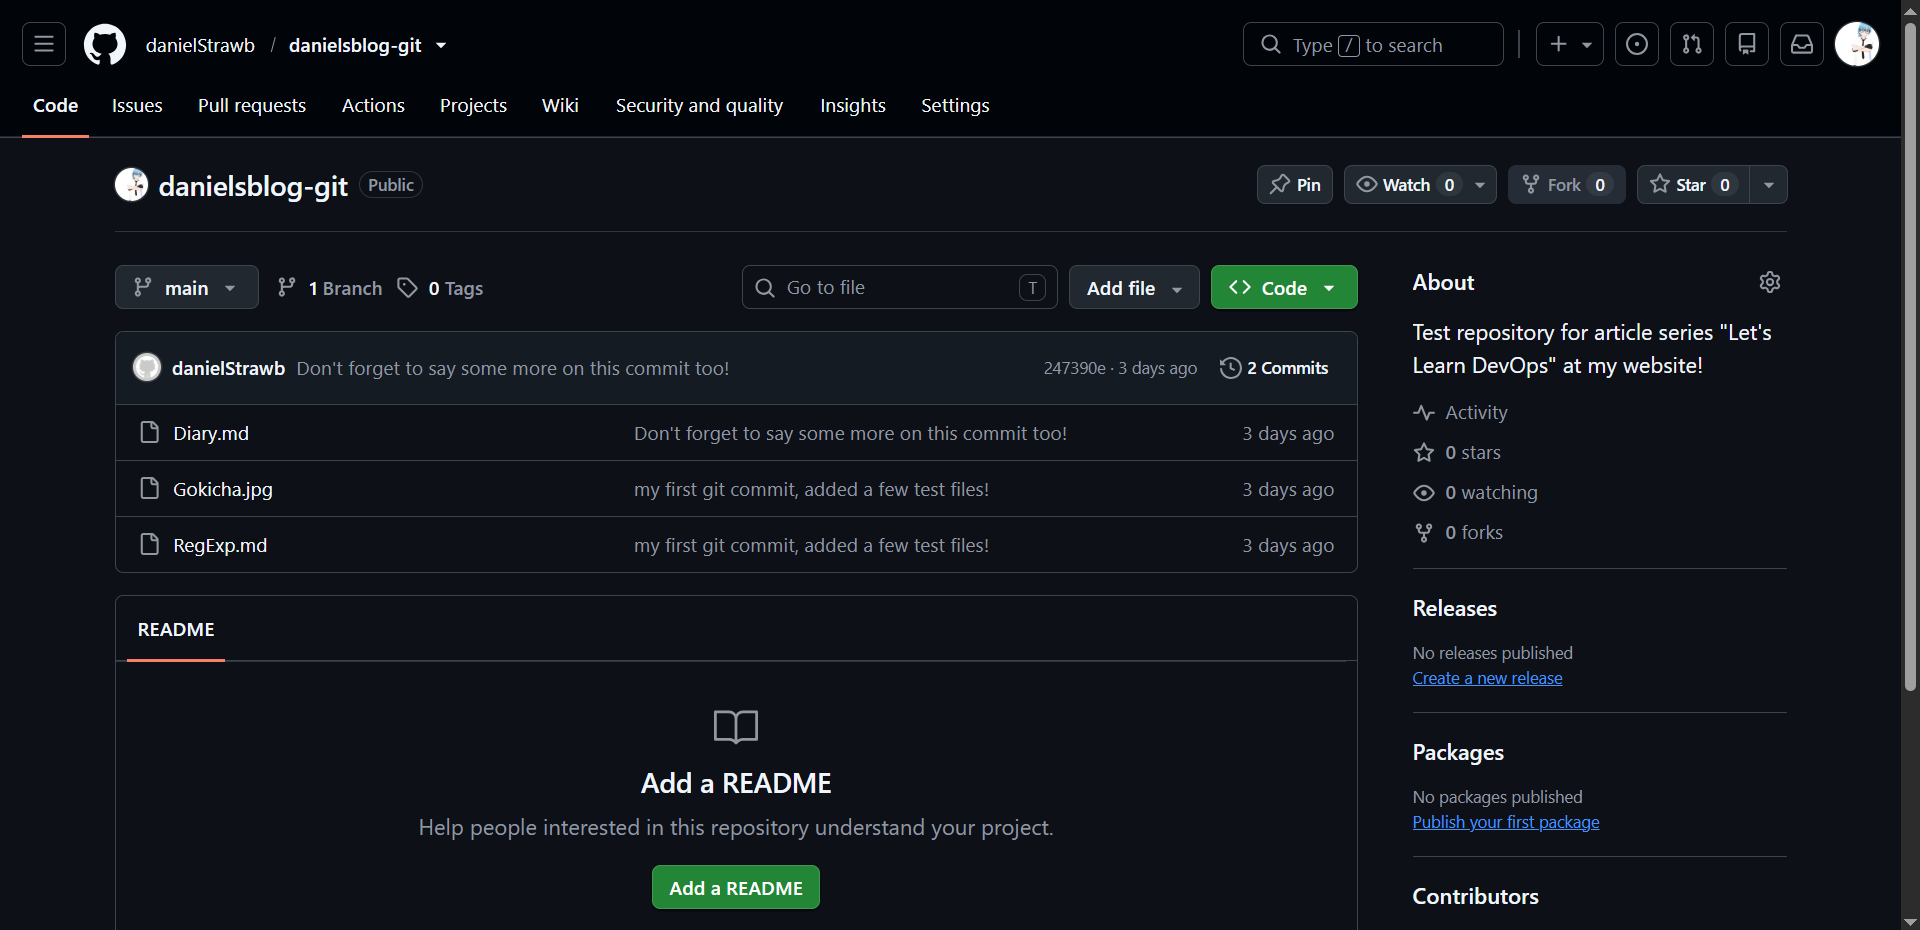
That's how our repository looks right now! Now, every time you want upload your repository, simply write "git push" in a command line.
Working with repositories on another computer
Since Git is meant to be used by a few people at the same time, we shouldn't skip experience to work this way. Command "git clone" can copy any repository on your computer:
    > git clone https://github.com/danielStrawb/melgu
    Cloning into 'melgu'...
    remote: Enumerating objects: 120, done.
    remote: Counting objects: 100% (120/120), done.
    remote: Compressing objects: 100% (107/107), done.
    remote: Total 120 (delta 6), reused 120 (delta 6), pack-reused 0 (from 0)
    Receiving objects: 100% (120/120), 71.58 KiB | 814.00 KiB/s, done.
    Resolving deltas: 100% (6/6), done.
    > cd melgu/

    > tree -L 4
    .
    └── Year 1
        └── Second Semester
            └── Programming - C++
                ├── L2.1
                ├── L2.10
                ├── L2.11
                ├── L2.12
                ├── L2.2
                ├── L2.3
                ├── L2.4
                ├── L2.5
                ├── L2.6
                ├── L2.7
                ├── L2.8
                └── L2.9

    16 directories, 0 files
As you may see, this is my repository for university works. But, there's only C++ homeworks of the first year of my study plan. Right now I ended the second yeaar, so it will be nice to update my repository. I'll add some new folders and projects.
    > ls
    'Year 1'  'Year 2'

    > git status
    On branch master
    Your branch is up to date with 'origin/master'.

    Untracked files:
    (use "git add ..." to include in what will be committed)
            Year 2/

    nothing added to commit but untracked files present (use "git add" to track)

    > git add .

    > git status

    ...
I hide everything after the last command to don't traumatize you - but belive me, there's a lot of files, and some of them I don't want to see in my commits, like as example - chache files. It's a good practice to ignore them by using .gitignore file - a hidden file in our folder to ignore files with specific names and extensions. The most common chache files in my situation have ":Zone.Identifier", ".bin", ".cache" at the end of their names and "/bin/" in the middle, so let's write our first ignore-file!
    > cat .gitignore
    # Simple gitignore file

    >  cat .gitignore
    # Simple gitignore file

    *.exe
    *.Identifier
    *.vsidx
    **/.vs/
    *.cache
    **/obj/
    **/bin/
This is just a text file, where hashtags used as comments - just a simple notes, which do nothing with git at all, but may be helpful to people reading this document. It's a common practice among programmers. Asterisks is a part of wildcard - a template for string, where one asterisk before .exe means "Every file in every place which ends on .exe" and "any folder at any place named .vs" for **/.vs/.
After we written this file, we need to update git's staging, use these two commands:
    > git add .
    > git rm --cached --recursive .
    ...
Finally, you can upload your files ignoring all the unnacessary files:
    > git add .
    > git commit -m "Second year C# added"
    [master 32398a1] Second year C# added
    633 files changed, 12332 insertions(+), 2 deletions(-)
    ...

    > git push
    Username for 'https://github.com': danielstrawb
    Password for 'https://danielstrawb@github.com':
    Enumerating objects: 543, done.
    Counting objects: 100% (543/543), done.
    Delta compression using up to 8 threads
    Compressing objects: 100% (524/524), done.
    Writing objects: 100% (537/537), 84.86 MiB | 2.30 MiB/s, done.
    Total 537 (delta 73), reused 0 (delta 0), pack-reused 0 (from 0)
    remote: Resolving deltas: 100% (73/73), completed with 2 local objects.
    To https://github.com/danielStrawb/melgu
    15bb684..32398a1  master -> master
Check out your GitHub page, it's been updated! ^_^
Contribuiting to repositories!
It's awesome to use git for yourself, you can also contribuite to projects made by other people. You easily can copy repository and program your own function or translation and give it to it's repository creator. That's how all the free and opensource software works! Even Richard Stallman says it's important to learn programing on making a real projects:
After that, you need to read the source code of real programs (or parts of them) and figure out what they do. Then start writing changes in them, to add features, or fix bugs if you can find out about specific bugs to fix. Ask some good programmers who are familiar with the code of those programs to read and critique your changes.
If you fix bugs in a free program that others are developing, the developers are likely to be glad to get fixes from you and will tell you the way to write them to make them good to install. Look at their TODO list for features they would like to add, and implement some. You will find it is a great satisfaction when the developers incorporate your changes.
Do this over and over and you will become good at developing software.
Since we are only starting journey into the world of IT, I belive many of you may have problems in programming your own software. Actually, It's not critical! There's a lot DevOps Engineers who don't know how to program, but you may practice on translating some programs on your native language - as example, Converter NOW can be a good start, just explore how other people do this and make your own translation! In case of Converter Now, translation files is located in folder packages/translations/lib/l10n/.
As a little challange, I decided to show you how I made my module for program called gallery-dl - it's a Python library to download pictures from diffirent websites, and I created my module to download manga from Mangayi. It took me some time to understand how this library works, so I started with copyting already-premade modules by other peoples, and little-by-little shape it to make it work with my website.
Visit gallery-dl Github page and click on button "fork" - it's going to create a copy of repository on your account. This is the repository we are going to make changes, and than merge them together to the main repository made by gallery-dl creator.
Let's copy our fork on computer:
    > git clone https://github.com/danielStrawb/gallery-dl

    Cloning into 'gallery-dl'...
    remote: Enumerating objects: 54393, done.
    remote: Counting objects: 100% (27918/27918), done.
    remote: Compressing objects: 100% (730/730), done.
    remote: Total 54393 (delta 27428), reused 27188 (delta 27188), pack-reused 26475 (from 2)
    Receiving objects: 100% (54393/54393), 11.94 MiB | 5.20 MiB/s, done.
    Resolving deltas: 100% (44579/44579), done.

    > cd gallery-dl/

    > git status

    On branch master
    Your branch is up to date with 'origin/master'.

    nothing to commit, working tree clean
Awesome! No I am going to change it's code to add my own functions, I am going to leave it behind, since it's more about programming than git, but feel free to read my code here, maybe you will find something interesting.
    > git status

    On branch master
    Your branch is up to date with 'origin/master'.

    Changes not staged for commit:
    (use "git add ..." to update what will be committed)
    (use "git restore ..." to discard changes in working directory)
            modified:   gallery_dl/extractor/__init__.py
            modified:   gallery_dl/extractor/mangatown.py

    Untracked files:
    (use "git add ..." to include in what will be committed)
            gallery_dl/extractor/mangayi.py

    no changes added to commit (use "git add" and/or "git commit -a")
There's also changes in file mangatown.py, but I used it as an example and made a bunch of notes in its source code, so I don't need these changes in my commit.
    > git add gallery_dl/extractor/mangayi.py gallery_dl/extractor/__init__.py

    > git commit -m "Added support for Mangayi.com"
    [master 8c8228ab] Added support for Mangayi.com
     2 files changed, 114 insertions(+)
     create mode 100644 gallery_dl/extractor/mangayi.py

    > git push
    Enumerating objects: 10, done.
    Counting objects: 100% (10/10), done.
    Delta compression using up to 8 threads
    Compressing objects: 100% (6/6), done.
    Writing objects: 100% (6/6), 1.76 KiB | 1.76 MiB/s, done.
    Total 6 (delta 4), reused 0 (delta 0), pack-reused 0 (from 0)
    remote: Resolving deltas: 100% (4/4), completed with 4 local objects.
    To https://github.com/danielStrawb/gallery-dl
    86047cf6..8c8228ab  master -> master
Since our repository is already set up, we don't need to use a bunch of commands as we do in the Case 1 exmaple. Now we can visit our GitHub page and see our changes has been published online:
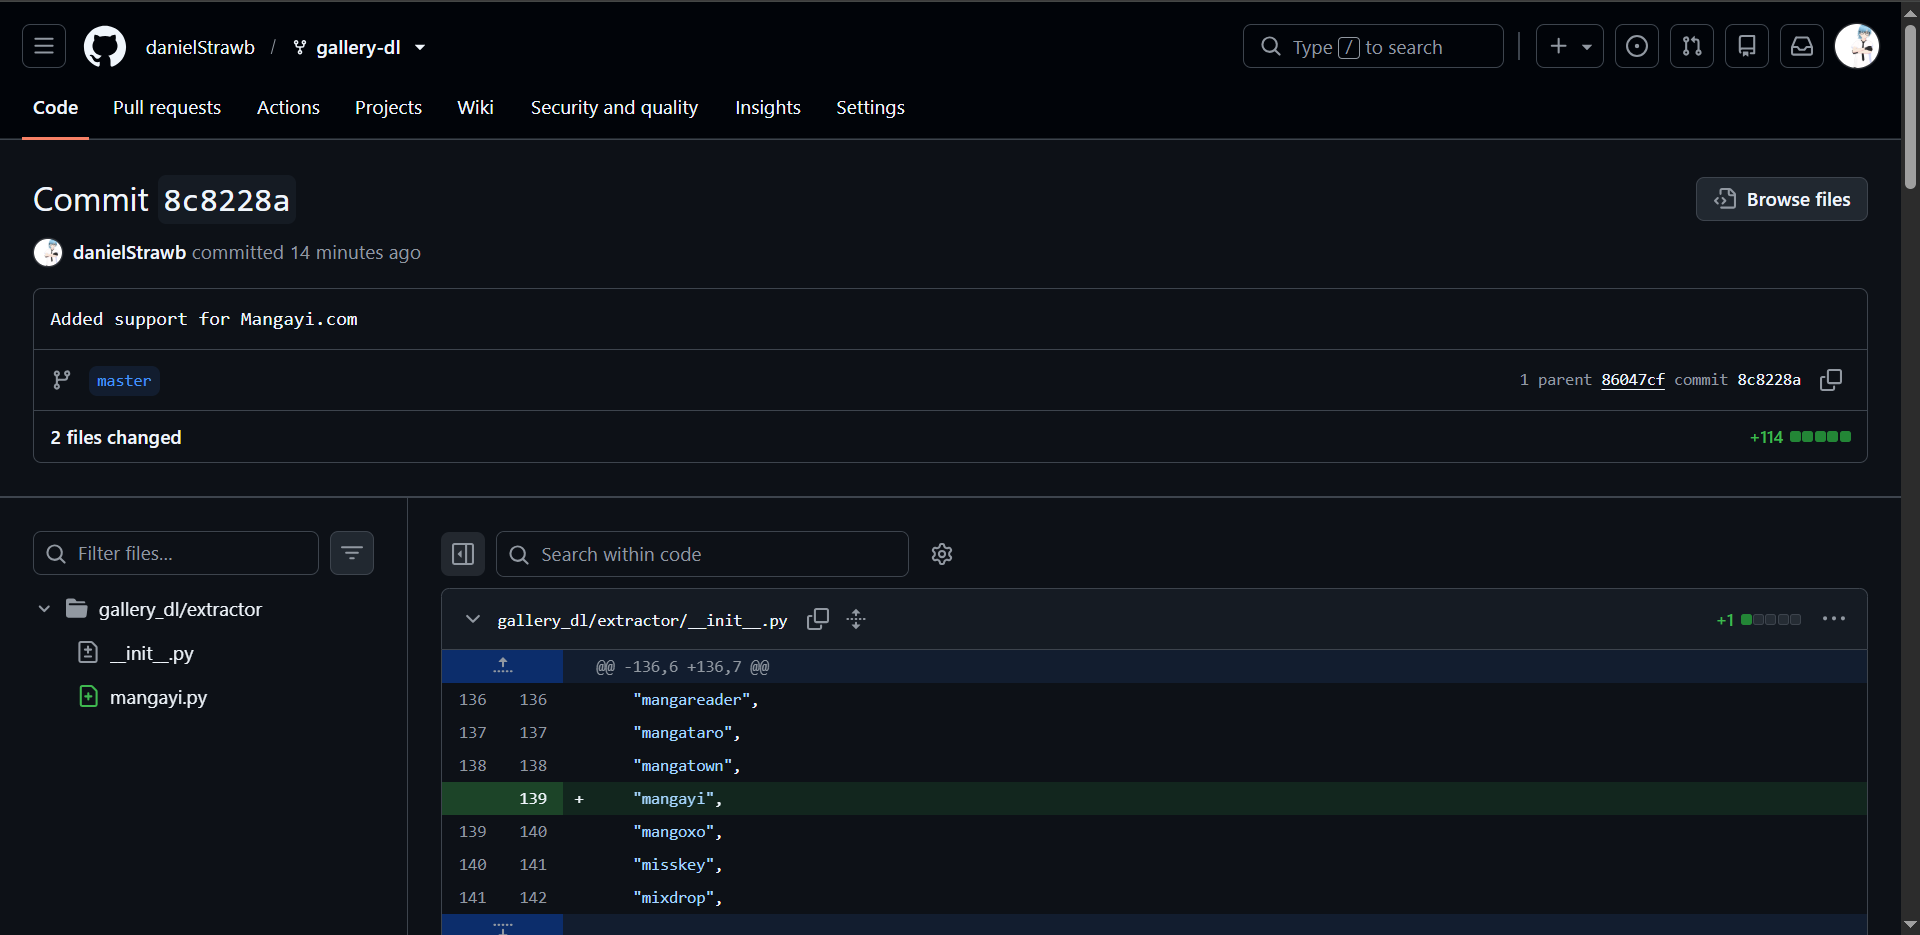
Before giving my commits to it's repository creator, I wish to test it on my devices to be 100% sure my code is doing everything right. I am going to skip this, but imagine like I write git clone https://github.com/danielstrawb/gallery-dl on diffirent machines and run a diffirent commands with it.
After little research in searching for some cute 4-koma manga i decided to try it on Ponkotsu Musume no Nichijou. I run this program inside our git repository we used in the first examples from this articles, and run this command:
    > gallery-dl https://mangayi.com/read/ponkotsu-musume-no-nichijou/
    .....

    > tree -L4
    .
    └── gallery-dl
        └── mangayi
            └── Ponkotsu Musume no Nichijou
                ├── c001: Ponkotsu Musume no Nichijou Chapter 1
                ├── c002: Ponkotsu Musume no Nichijou Chapter 2
                ├── c003: Ponkotsu Musume no Nichijou Chapter 3
                ├── c004: Ponkotsu Musume no Nichijou Chapter 4
                ├── c005: Ponkotsu Musume no Nichijou Chapter 5
                ├── c006: Ponkotsu Musume no Nichijou Chapter 6
                └── c007: Ponkotsu Musume no Nichijou Chapter 7
It works very well! So, let's give our changes to original creator.
During the writing of this paragraph, I noticed it's creator closed requests from others on GitHub - but this is not a big deal, since they are accepting their commits on Codeberg right now. Since I already have Codeberg, I'm doing the same steps with forking repository from their Codeberg page and adding my new repository as a source inside my fork repository:
    > git remote -v
    origin  https://github.com/danielStrawb/gallery-dl (fetch)
    origin  https://github.com/danielStrawb/gallery-dl (push)

    > git remote add codeberg https://codeberg.org/danielStrawb/gallery-dl

    > git remote -v
    codeberg        https://codeberg.org/danielStrawb/gallery-dl (fetch)
    codeberg        https://codeberg.org/danielStrawb/gallery-dl (push)
    origin  https://github.com/danielStrawb/gallery-dl (fetch)
    origin  https://github.com/danielStrawb/gallery-dl (push)

    > git fetch codeberg
    remote: Enumerating objects: 60275, done.
    remote: Counting objects: 100% (5603/5603), done.
    remote: Compressing objects: 100% (497/497), done.
    remote: Total 60275 (delta 5336), reused 5305 (delta 5106), pack-reused 54672 (from 1)
    Receiving objects: 100% (60275/60275), 18.69 MiB | 59.00 KiB/s, done.
    Resolving deltas: 100% (49293/49293), completed with 1 local object.
    From https://codeberg.org/danielStrawb/gallery-dl
    ...

    > git status
    On branch master
    Your branch is up to date with 'origin/master'.

    nothing to commit, working tree clean

    > git push --force-with-lease codeberg master
    Enumerating objects: 54397, done.
    Counting objects: 100% (54397/54397), done.
    Delta compression using up to 8 threads
    Compressing objects: 100% (9779/9779), done.
    Writing objects: 100% (54395/54395), 11.94 MiB | 3.38 MiB/s, done.
    Total 54395 (delta 44583), reused 54395 (delta 44583), pack-reused 0 (from 0)
    remote: Resolving deltas: 100% (44583/44583), completed with 1 local object.
    remote:
    remote: Create a new pull request for 'danielStrawb:master':
    remote:   https://codeberg.org/mikf/gallery-dl/compare/master...danielStrawb:master
    remote:
    To https://codeberg.org/danielStrawb/gallery-dl
    + 9205bf0b9...8c8228ab3 master -> master (forced update)
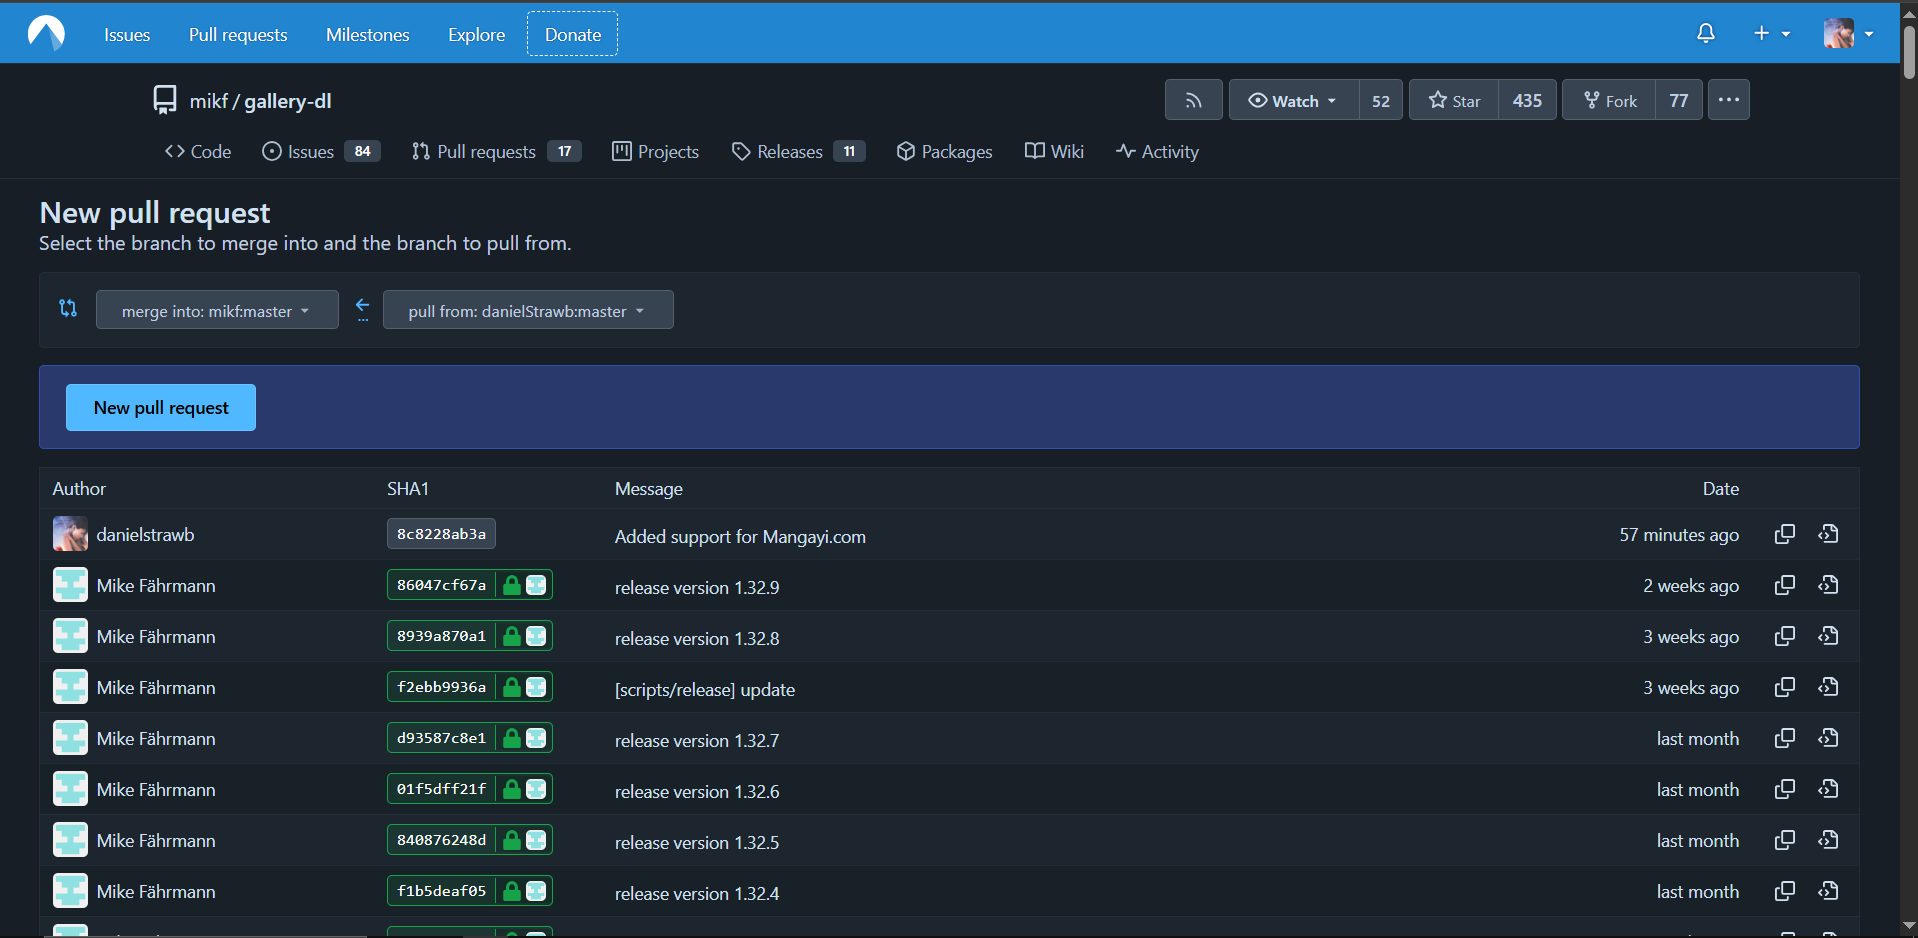
Before commiting to a new repository, it's better to do git fetch before, since different repositories could have conflicting file changes, like the same document can have 2 different versions in 2 repositories - it's called version conflict solving. In cases like that, it cause an eror with simple git push, so I added --force-with-lease to push my Github repository one-to-one.
Go to the original repository in menu "Pull Requests" and click "New pull request" and merge the into the master of original repository from the master of your fork:
Click on a "Pull request" and merge gallery-dl/master with my danielStrawb/master. You can see a page of my contribution here. Author of repository is going to review my changes, edit them and merge with main repository.
Conclusion
This is the first article of my new series, and I m kinda nervous - with all the problems I have during this summer, I've done everything I could to release it as full as I can right now - some of "Appendix" parts is currently empty but I am going to write them in the near future.
I hope this articles is been helpful to someone since I know different people read my website, from musician and programmers to average peoples who are trying to learn English language with my gramatically-poor English. I am grateful to every reader I have.
This series of articles I am writing primary for yourself - I may be incorrect somewhere so it's recommended to learn things not with my gudes only, but together with me. As example, if you interested in Git after this article, I highly recommend you to read bobbyiliev/introduction-to-git-and-github-ebook. This guy is awesome and I've been inspired by his books while writing this article.
Writing this article I understand it's better if I write all episodes of "Let's Learn DevOps" more as a collection of "Appendix" and diffirent notes. It's time consuming to write article from the beginning to the end. I decided to start my articles only with the basic information but improve them with time by adding appendixes and extra notes which is better in case if I can find some lifehack to make something I've already written faster - it's easier to rewrite a single block than rewriting full text relying on context of my new discovery.
In the next episode I am going to show you how to install Linux and using it in case if you cannot install it on your computer, some more fun Linux commands and maybe I also cover HTML and CSS just for a little bit and we are going to create our first website using preinstalled programs on Linux Mint.
I belive it's better if we are going to create our own project covering all technologies of DevOps. I don't know what's we are going to make right now - but I have some interesting idea like website where people can write stories about their lovely older sisters and make them public, comment and rate diffirent stories - just something fun to cover databses, git, website creation and other concepts behind our everyday work.
At the end, if you want to start learning by yourself - try to install Linux in a virtual machine, download software from application store in Ubuntu or Linux Mint. Find your comfort in technologies we are going to use.
Appendix: Glassory
Git - software on your computer to maintain and create repositories
Repository - a storage of files and their changes history
Online Repository - Github or any other website which stores your VCS repositories online.
Commit - a record of your file changes with user comment and it's own identifier to fast switch between states of your file in a different time periods.
Staging - a list of tracked files - you can commit a few files and leave others without changes in a history.
Branch - sub-categories of repository. You may want to have a general branch with all the most important changes and "experimental" for a short-term changes to not accidently break something to average users of your product. It's nice to have a "testing" branch before giving your final programs to everyone.
Appendix: Installing Git
work in progress..
Appendix: Branches
work in progress..
Appendix: Terminal commands
Using your computer's command interface can be a good practice since using commands instead of buttons is usually more flexible and fast way to get the same result - an awesome thing about commands is that you can automate everything using them - in future articles we are going to make "scripts" - a premade set of commands to simplify our life and save hours of routine work.
Both Windows, and Linux together with MacOs have command line, for Windows it's cmd.exe or Power Shell, and for Linux and Mac Os this is terminal. Most of the commands described here are the same for any operating system.
Opening terminal or command line you see nothing but black screen with white letters. It's a wise decision to ask "Where am I?", so let's find an answer:
    > pwd
    /home/jni
Command pwd is abbreviature from "print working diary", you may see right now I am at /home/jni - this is my username on my Linux computer, in the case of Windows is C:\Users\alison to me.
Also, you can find you username with command whoami - kinda self-descriptive:
    > whoami
    jni
Command ls lists all the files in current folder:
    > ls
    ansible  bash  copy  git  junk  myfolder animals.txt fruits.txt
You may see I have a good structure, since for every program I have it's own folder, so let's create another one using mkdir:
    > mkdir tutorial
    > ls
    ansible  bash  copy  git  junk  myfolder  tutorial animals.txt fruits.txt
let's change our current place with command cd - change directory for short:
    > cd tutorial
    > pwd
    /home/jni/tutorial
You can create empty files using command touch, let's try to "touch" Nana!
    > ls

    > touch nana
    > ls
    nana
Why does this command have such strange name? Actually touch meant ot be used to change the date of "Last Opened" in every file's data - so called metadata. Metadata store data of file creation, it's place on computer's hard drive. But, Linux works in a way that if it's strying to edit some data on file that doesn't exist, it's simply write these data in a new file.
P.S: if your file has been created on something like digital camera, they usually write some extra metadata like "Camera Model" so you may understand a lot about file just by finding it somewhere on the Internet.
But, I belive using command touch is fun, so let's touch Nana once more...
    > touch nana
    > touch nana
    > touch na...
Nana: Hey, stop touching me! You are meanie! :<
I have a few files in other folders, so let's also copy some of them here!
    > ls ../
    ansible  bash  copy  git  junk  myfolder  tutorial animals.txt fruits.txt

    > ls ../ansible/
    debian_install_docker.yaml  debian_update.yaml  local_inventory.ini  ping.yaml
../ is a reference to an upper-level folder, so-called "parent" directory, while ./ is a reference to the folder you are in right now. Using TAB on your keyboard you can list all the files in the path you are typing.
I wish to copy files like animal.txt and fruits.txt to current folder, there's and awesome command cp - shortly from "copy":
    > cp ../animals.txt ~/fruits.txt ./

    > ls
    animals.txt fruits.txt
cp can take any ammount of files at the same time, but the last argument always should be the place you are going to copy files into, right now I want them in /home/jni/tutorial, but Terminals also have shortcut for /home/jni/ - simply use ~/ which is going to refer you to your home directory.
    > ls ~/
    > ansible  bash  copy  git  junk  myfolder  tutorial animals.txt fruits.txt
You may want to see content of your files - usually this is text files, so command cat may be helpful here:
    > cat animals.txt
    panda
    penguin
    fox
    bear

    > cat fruits.txt animals.txt
    apple
    watermelon
    ananas
    panda
    penguin
    fox
    bear
As you may see, cat also can take a few arguments - actually, it's name is abbreviature from "Concatenate", so it's natural for this program to join a few files into one!
The last thing i want to show, is how to manage files - move them, rename and delete.
Command mv can do both, rename and rename files and directories.
    > mv fruits.txt file.txt

    > ls
    animals.txt file.txt

    > mkdir tmp

    > mv animals.txt ./tmp/
    > ls ./ ./tmp

    ./:
    file.txt  tmp

    ./tmp:
    animals.txt
Finally, you can remove file and folder with command rm. Let's remove nan... [Nana: One more word, and you are dead, Daniel!]
Alright, maybe this is not the best example... Let's try to delete file.txt:
    > rm file.txt
    > ls
    tmp

    > cd ../
    > rm ./tutorial/
    > rm: cannot remove './tutorial/': Is a directory

    > rm -r ./tutorial/
    > ls
    ansible  bash  copy  git  junk  myfolder
-r is a flag - special option for command rm which stands for "recursive" - we are going to delete folder together with all the content inside. Linux command rm unlike Windows or Mac OS have no Recycle Bin - you cannot restore deleted files - be careful with this one! In the article about Linux I am going to show you how to make Recycle Bin to have a temporary storage for every deleted files, but right now just be careful!
This is the most basic console commands for managing your files, practice a little bit and soon you'll understand it's a way more faster way to manage your files. Hovewer, there's some more commands to edit your files, creating them and many-many other things, I feel this is more advanced topic for the future articles from "Let's Learn DevOps" about Linux.
At the end, let me show you a simple command which can save hours of your personal life:
export filename=$(date +%d-%m-%G-backup.tar) && tar --create --file="${filename}" ~/files/ && scp "$filename" daniel@samsung_smartphone:/data/files/home/$(date +%d-%m-%G-backup.tar) &
Yes, this is kinda long command, but it's not just a one single command - here we are using a few commands at the same time. Everything this command is doing, it's archiving all the files from "files" in my home directory (~/files), using command date I create the filename for my archive - in my case it's "23-08-2026-backup.tar", and using command scp I'm sending this file on my phone trought Wi-Fi network. An awesome thing about this command that it works in background - I can close my terminal and play some videogame, take a little walk while my computer archiving gigabytes of files and copying them to my smartphone.
Maybe the thing I am showing right here is hard - and it's absolutley fine since I wasted years upon years to become confident Linux user, but I am just showing you the things you can do to simplify your own life. In "Learning Linux" I am going to explain how I created this command and you can do the same just by thinking like "Okay, I want to copy my files here, and put them there - when it's done, I am going to send only the pictures out of all the files I copied and send them to my friend's computer trought Wi-Fi".